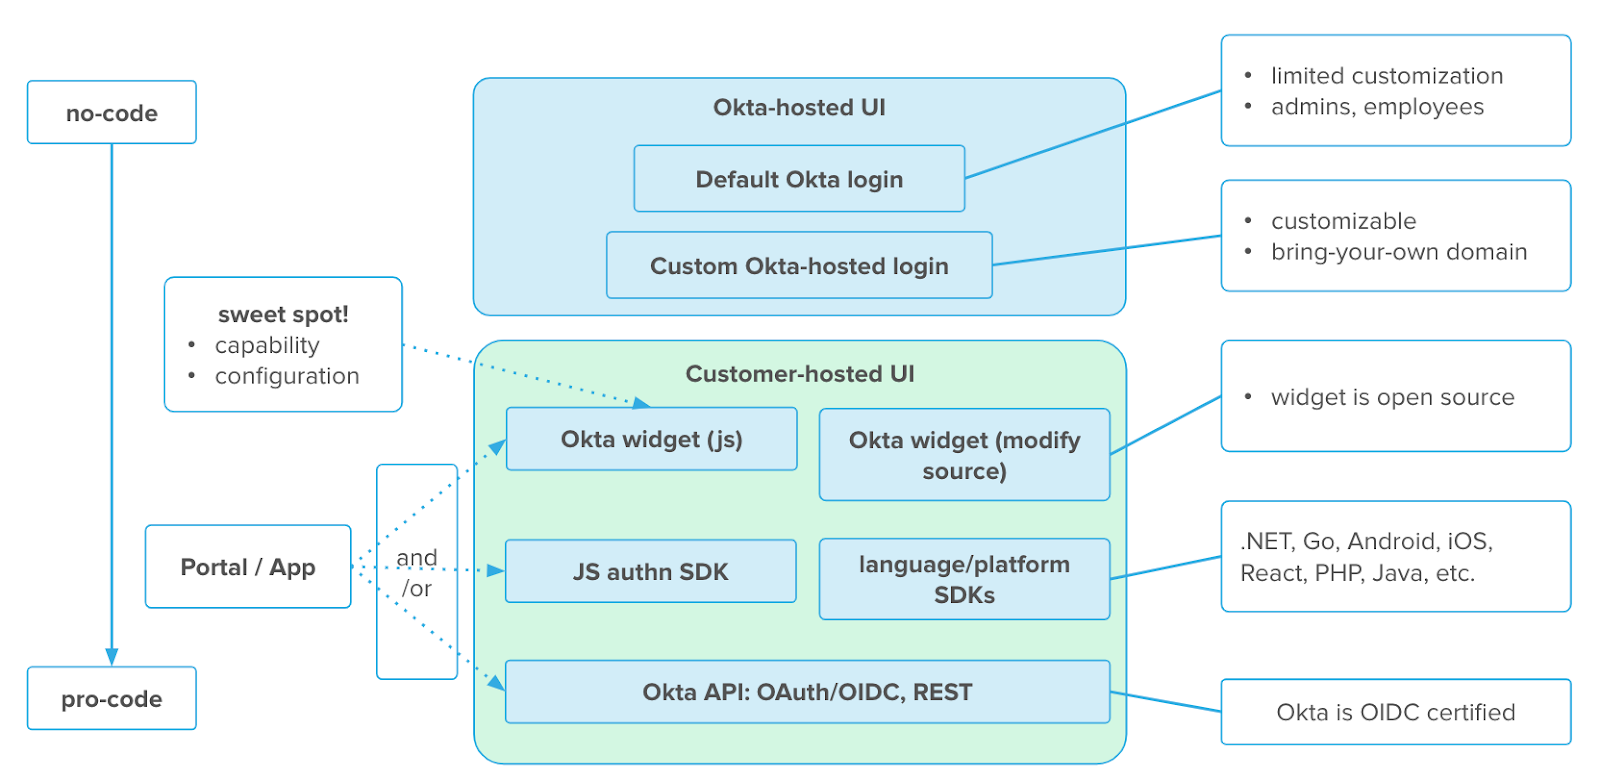
B2C and B2B typically have one common use case: A custom portal or custom application. Okta provides several ways to enable authentication for your application:
- No-Code with the Okta hosted sign-in widget
- Low-Code with the Okta hosted sign-in widget (customized) or the custom hosted sign-in widget
A custom hosted sign-in widget from Okta is the perfect way to both reduce development effort, by using a library with a ton of pre-existing features, and at the same time having full flexibility on design and configuration. - Pro-Code by using Oktas REST API or SDKs to create a fully-customized UI
See the following diagram for details about the options:

For a better user experience, it is necessary to customize the user login and recovery flows, so a custom portal/application will be used.
This guide will focus on the password reset recovery flow and provide guidance for the following scenarios:
- Okta hosted: Redirect back to your application after successful password reset
- Custom hosted: Use the custom hosted sign-in widget for the password reset flow and have the right redirect after a successful password reset
- Next blogpost will explain pro code: How to set up a fully custom password reset flow with the auth-js from Okta
Password Reset Using sign-in widget
Using Okta's sign-in widget for authentication is a good way to have high customization and configuration functionality, and at the same time is a low-code approach. Okta will provide the necessary functionality with the JavaScript library, which you can find here: https://github.com/okta/okta-signin-widget
If you are starting a password reset flow (e.g. as self-service from the user a.k.a. "Forgot Password"), the user will receive an email to reset his or her password. The link provided by Okta will look like this:
https://<YourOktaURL>/signin/reset-password/<ResetToken>
Okta Hosted with custom redirect
In the standard email template, this link leads to the Okta hosted variant of the sign-in widget. The user will be redirected to the End User Dashboard after the successful reset of the password. This can be changed by adding ?fromURI=YourTargetRedirect in the template.
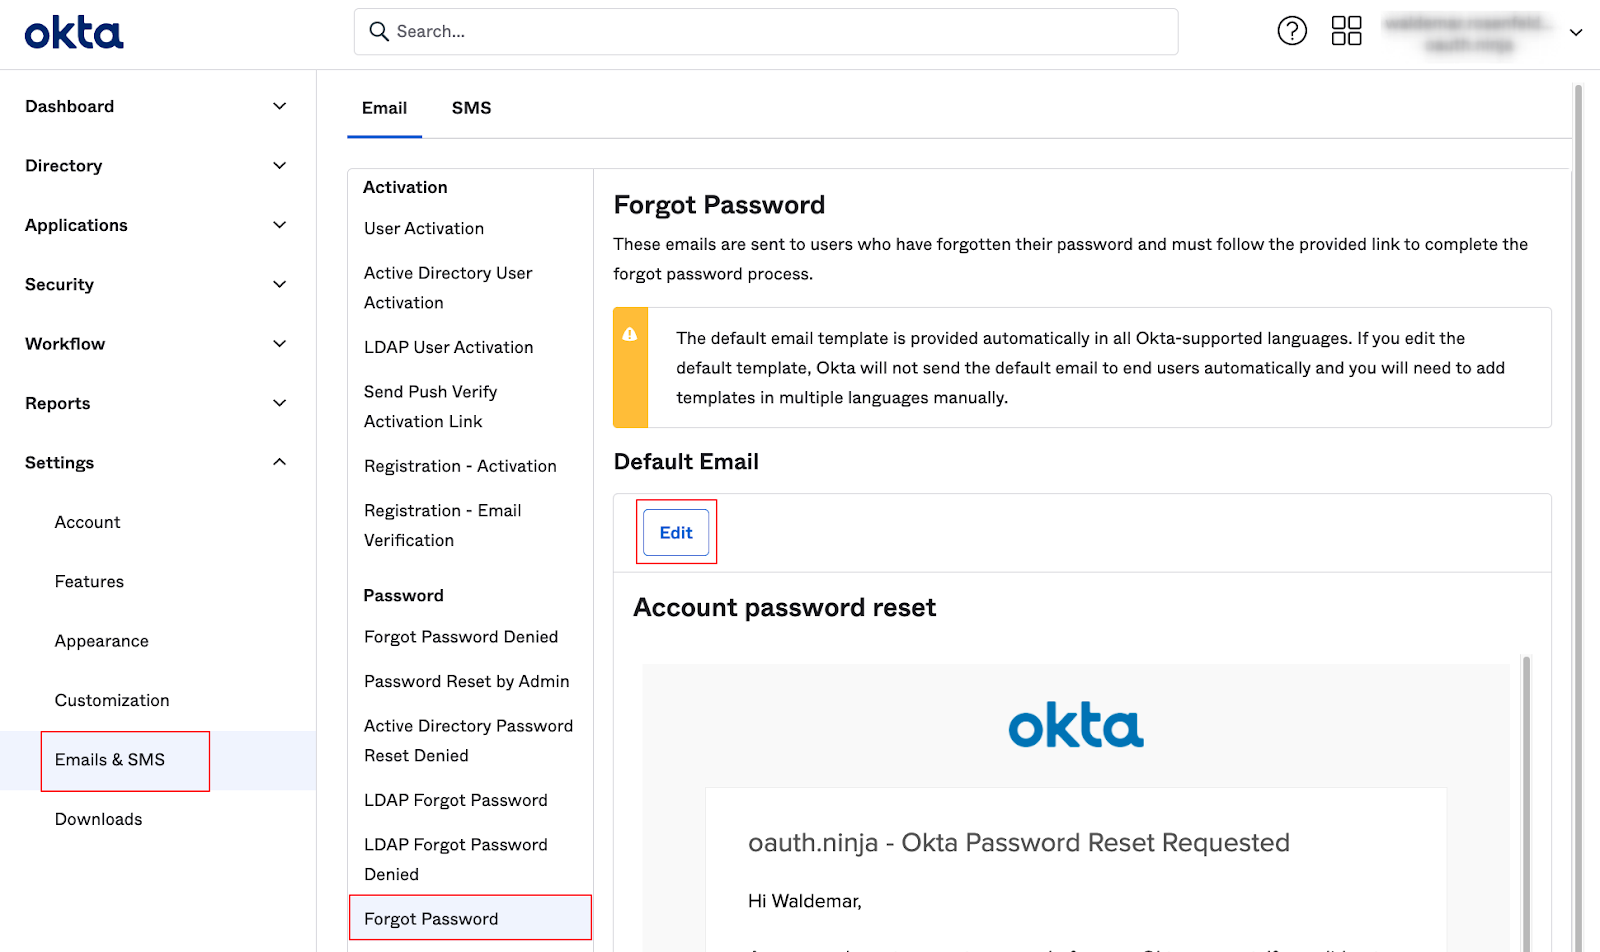
To do this, you can set up your email templates in Settings → Emails & SMS → Email. In this example we will change the template for Forgot Password.

In this example, the standard HTML code for the link will look like this:
<div style="background-color:#fafafa;margin:0">
<table style="font-family:'proxima nova' , 'century gothic' , 'arial' , 'verdana' , sans-serif;font-size:14px;color:#5e5e5e;width:98%;max-width:600px;float:none;margin:0 auto" border="0" cellpadding="0" cellspacing="0" valign="top" align="left">
<tbody>
<tr align="middle">
<td style="padding-top:30px;padding-bottom:32px"><img src="$oktaLogoUrl" height="37" /></td>
</tr>
<tr bgcolor="#ffffff">
<td>
<table bgcolor="#ffffff" style="width:100%;line-height:20px;padding:32px;border:1px solid;border-color:#f0f0f0" cellpadding="0">
<tbody>
<tr>
<td style="color:#5e5e5e;font-size:22px;line-height:22px"> $org.name - Okta Password Reset Requested </td>
</tr>
<tr>
<td style="padding-top:24px;vertical-align:bottom"> Hi $StringTool.escapeHtml($user.profile.firstName), </td>
</tr>
<tr>
<td style="padding-top:24px"> A password reset request was made for your Okta account. If you did not make this request, please contact your system administrator immediately. </td>
</tr>
<tr>
<td style="padding-top:24px"> Click this link to reset the password for your username, $user.profile.login: </td>
</tr>
<tr>
<td align="center">
<table border="0" cellpadding="0" cellspacing="0" valign="top">
<tbody>
<tr>
<td align="center" style="height:32px;padding-top:24px;padding-bottom:8px"> <a id="reset-password-link" href="$resetPasswordLink" style="text-decoration:none"><span style="padding:9px 32px 7px 31px;border:1px solid;text-align:center;cursor:pointer;color:#fff;border-radius:3px;background-color:#44bc98;border-color:#328c71 #328c71 #2f856b;box-shadow:0 1px 0 #d8d8d8">Reset Password</span></a> </td>
</tr>
<tr>
<td align="center" style="color:#999"> This link expires in $resetPasswordTokenExpirationDate. </td>
</tr>
</tbody>
</table> </td>
</tr>
<tr>
<td style="padding-top:24px"> If you experience difficulties accessing your account, send a help request to your administrator: </td>
</tr>
<tr>
<td style="padding-top:24px"> Go to your <a href="$baseURL/help/login" style="color:#007dc1;text-decoration:none"><span style="color:#007dc1;text-decoration:none">Sign-in Help</span></a> page. Then click the Request help link. </td>
</tr>
</tbody>
</table> </td>
</tr>
<tr>
<td style="font-size:12px;padding:16px 0 30px 50px;color:#999"> This is an automatically generated message from <a href="http://www.okta.com" style="color:rgb( 97 , 97 , 97 )">Okta</a>. Replies are not monitored or answered. </td>
</tr>
</tbody>
</table>
</div>
Or specifically the button:
<td align="center" style="height:32px;padding-top:24px;padding-bottom:8px"> <a id="reset-password-link" href="$resetPasswordLink" style="text-decoration:none"><span style="padding:9px 32px 7px 31px;border:1px solid;text-align:center;cursor:pointer;color:#fff;border-radius:3px;background-color:#44bc98;border-color:#328c71 #328c71 #2f856b;box-shadow:0 1px 0 #d8d8d8">Reset Password</span></a> </td>
To redirect to your application, add a redirect uri to the link:
<td align="center" style="height:32px;padding-top:24px;padding-bottom:8px"> <a id="reset-password-link" href="$resetPasswordLink?fromURI=YourTargetURLForRedirect" style="text-decoration:none"><span style="padding:9px 32px 7px 31px;border:1px solid;text-align:center;cursor:pointer;color:#fff;border-radius:3px;background-color:#44bc98;border-color:#328c71 #328c71 #2f856b;box-shadow:0 1px 0 #d8d8d8">Reset Password</span></a> </td>
For better visibility, just the href part:
href="$resetPasswordLink?fromURI=YourTargetURLForRedirect"
Custom Hosted sign-in widget
As the Link in the Reset-Password-Email is:
https://<YourOktaURL>/signin/reset-password/<ResetToken>
Keeping in mind that the Okta hosted version is also using the sing-in widget, you can change the target to your custom hosted version. To do this, follow the steps above to edit the template and also change the button to the following value:
<td align="center" style="height:32px;padding-top:24px;padding-bottom:8px"> <a id="reset-password-link" class="${resetPasswordLink}" href="https://YourCustomHostedURL/signin/reset-password/${recoveryToken}" style="text-decoration:none"><span style="padding:9px 32px 7px 31px;border:1px solid;text-align:center;cursor:pointer;color:#fff;border-radius:3px;background-color:#44bc98;border-color:#328c71 #328c71 #2f856b;box-shadow:0 1px 0 #d8d8d8">Reset Password</span></a> </td>
So the Link will look like this:
class="${resetPasswordLink}" href="https://YourCustomHostedURL/signin/reset-password/${recoveryToken}"
Note: It is not possible to save the template without the value ${resetPasswordLink}, so this information needs to be present.
Important:
Your custom-hosted sign-in widget needs to be setup correctly, so that the reset password request will be recognized:
- The feature router must be enabled: https://github.com/okta/okta-signin-widget#feature-flags
- The widget needs to be started on the endpoint "/signin"
An example of a configuration can be found:
https://github.com/tohcnam/letsTravel/blob/master/public/js/custom-login.js


